When describing my 3X weekly training sessions I do during my lunch break, I’ve found the easiest, most accurate description is “MMA for self defense, not sport”.
For those that even know what MMA is (“mixed martial arts”) they immediately understand the reference to it not being for sport. In regulated MMA bouts, there are many things off limit, like the gouging of eyes, striking of throats, and kicking of groins. Exactly the type of techniques you want to use in a real life self defense scenario!
For those who know martial arts, I can usually make reference to studying MMA from an aikido perspective and they at least begin to understand why. I’ve been asked if this is Hard Aikido. It’s really not. Hard Aikido appears fairly effective (and darn cool), but it still involves just too many complex moves, and suffers against attacks that are based in grappling.
The Hard Aikido moves are beautiful – a true art – but the spheres involved are just too large. The aikido that my sensei is drilling into me uses very small spheres, usually transitioned to by something in Brazilian Ju-Jitsu, Muay Thai, or Wing Chun, depending on the distance of the original attack. Spheres? What are spheres, you ask? Learn more.
For those who have no idea what MMA refers to, they still understand the “self defense, not sport” reference refers to my lack of interest (but not respect) for progressing to higher levels (belts) or doing sport competition. It’s simply me, my sensei, and a desire to learn very practical techniques to protect my family and friends.
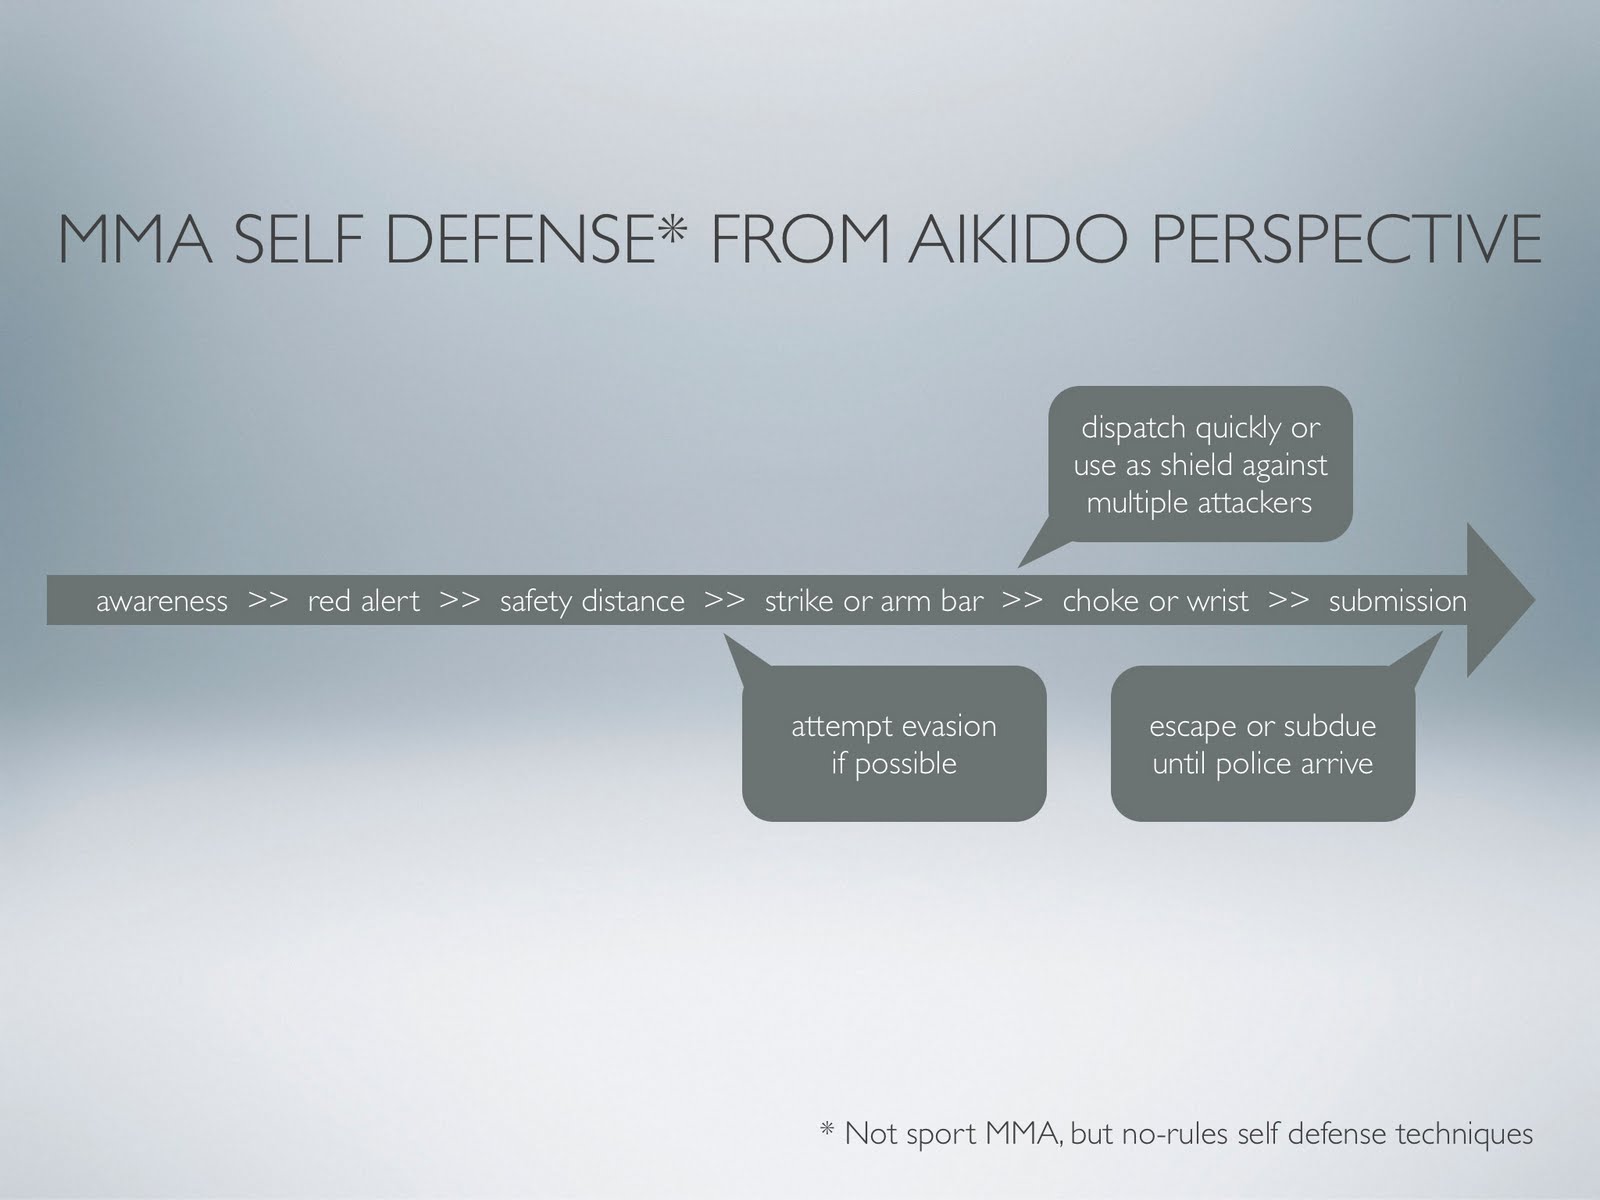
I put together the attached diagram to quickly describe what our training is beginning to look like in a flowchart manner (because I’m a dork for diagrams). It’s based off a quick flowchart my sensei drew (as an artist, he also tends to diagram alot; we have a whiteboard in the dojo).
As you go through life, you practice continuous, calm awareness, noted on the left side of the diagram. When a situation progresses from normal (green) to cautionary (yellow) to immediately dangerous (red), my hope is that I train my mind/body to respond automatically in those high stress situations.
Scientific writers describe this auto response as an “autonomic reaction” – an automatic response of the mind and body at a subconscious level. Aikido writers refer to this “move second, strike first” concept as harmonizing, or welcoming the attack. Your awareness to an attacker (moving first) enables you to blend with the attack (moving second) and still land the first blow (striking first). The blow might be a parry done while spinning to one side, but if done in the correct “always thinking forward” mindset, the first strike disables the attacker’s would-be blow.
Of course, the primary goal would be to evade those situations anyway, even before they hit the caution stage.
There are thousands of techniques in the various martial arts that we *could* study, but won’t. Unless you are logging decades of concentrated study inside a dojo, all those techniques just won’t work in a high stress situations when your “fight or flight” adrenaline has taken over your brain and body functions. But if you know a few relatively simple and fast techniques very, very, very well, the mind/body should be able to protect you and your loved ones when it goes into auto-drive.
Moved our kiwi trellis out of the food forest and up close to the house where it can be hidden from view for just one reason: my wife thinks it is ugly.
And she’s right. The rest of the food forest is quite beautiful with the fruit trees, berry bushes, and recently completed low retaining walls. The kiwi trellis (for both fuzzies and hardies) is three 4×4 posts sticking seven feet up in the air. They are ugly and will stay ugly for several years until the kiwis cover them (they grow like grapes) or the nearby fruit trees get tall enough to screen them from view.
So I took a few hours and moved them before they got settled in their new/old spot in the food forest. Will think of how to keep the deer away later. Perhaps by the time the kiwi vines bear fruit (a few years from now), we’ll have big dogs back in our lives.
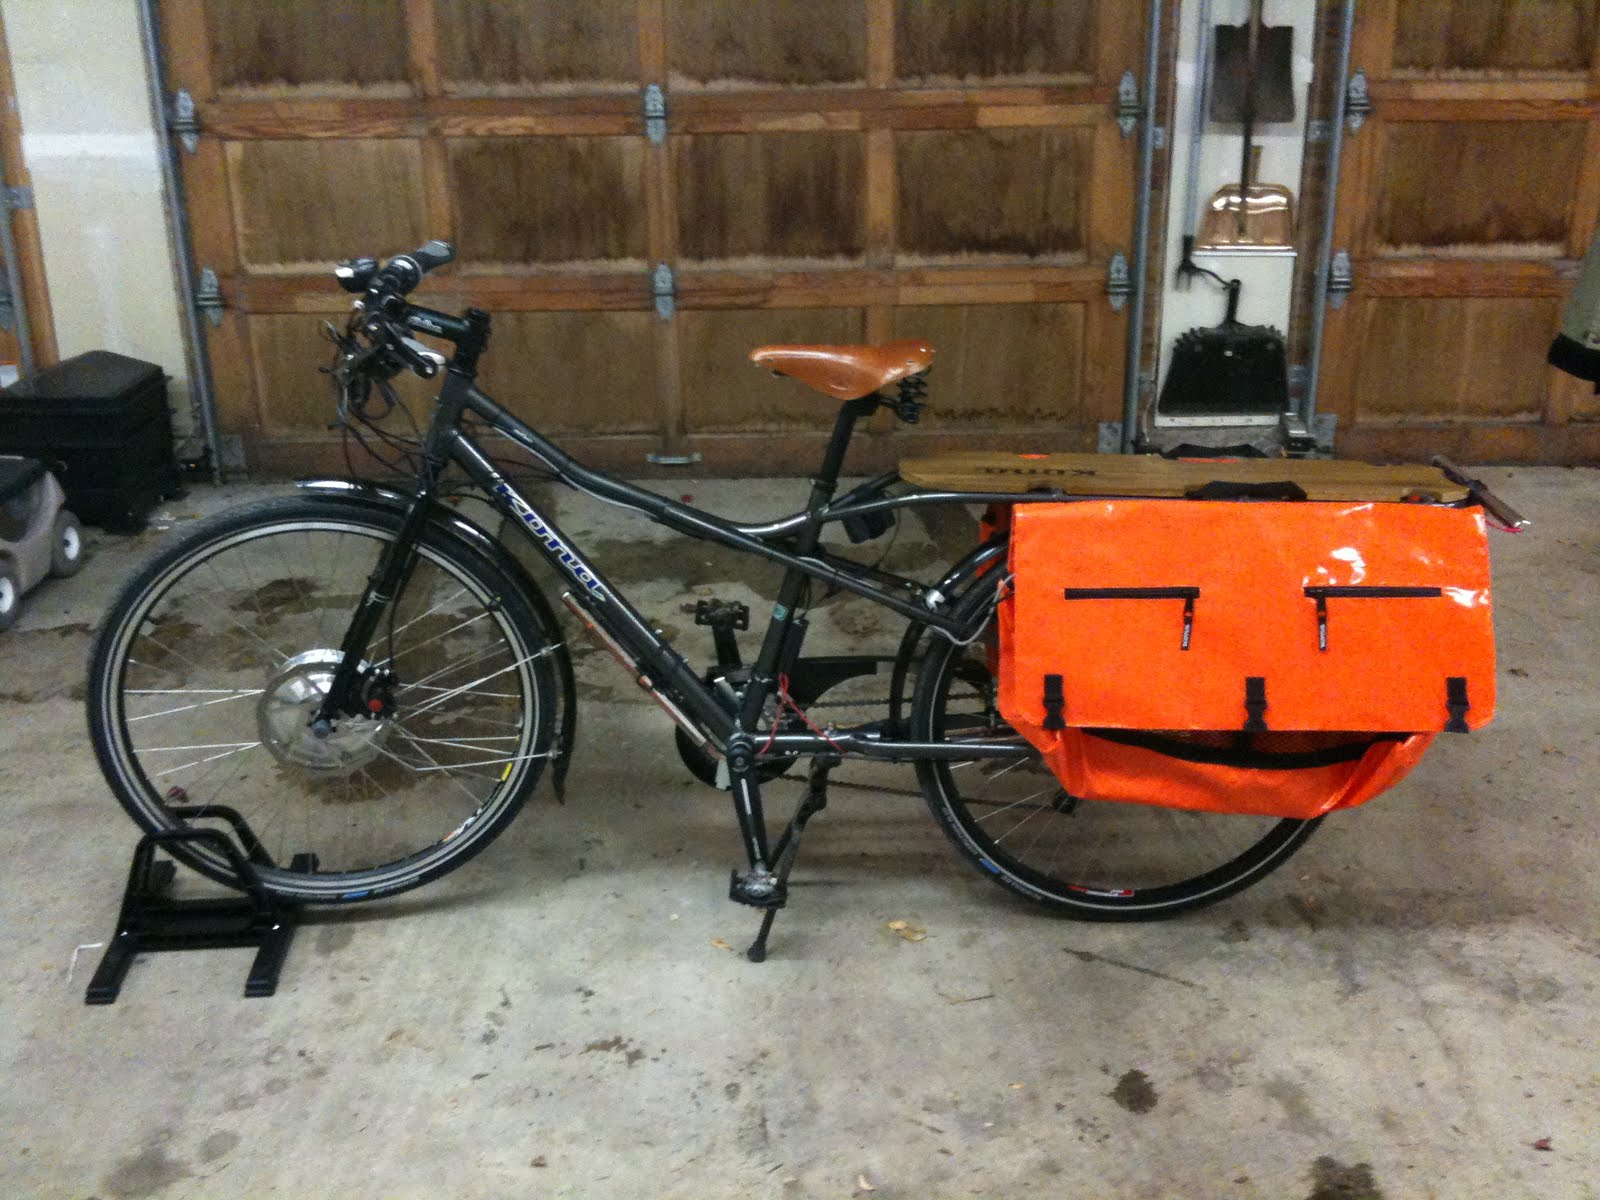
Note the waterlogged mail. Clearly the zipper pockets on the 2010 Kona Ute saddle bags are not waterproof. Bummer.
And the panniers’ main cargo pocket does not fair much better. They pool water in the bottom of them, as it enters through the bag’s front gap while riding. I’m going to use a grommet kit to put in a drainage hole in each bag. We’ll see if that solves the problem, or aggravates it by allowing road debris to enter the bags from below.
Unfortunately, this also means I’m going to have to invest in a truly waterproof Ortlieb or Topeak bag to store my dojo gear. Practicing yesterday in a 30% wet gi was not so much fun. Actually, it was alot of fun, but a gi that is wet binds and slows you down pretty significantly. Which means you get hit much more often. Not good.
I’ve discovered that I put the thumb throttle for the eZee electric pedal assist on the wrong side. I placed it on the right since that where it was on my motorcycles. But for a bicycle, you do most of your shifting with your right hand. During typical throttle usage, I’m downshifting as I am climbing a hill. Well, that’s also exactly when you want to crank on the thumb throttle. Doing both at the same time requires more manual dexterity than I have. Will remedy this next time I need to tweak something on the bars or stem.
For my one year experiment of not driving when by myself, I’m replacing the hauling capacity of my car with a longtail utility bicycle. More details here for new readers regarding what constitutes a utility bike and how I selected the 2010 Kona Ute as my final choice.
For more reading on bicycles recapturing a role as utilitarian people-movers, the person behind Cycle 9 wrote a lengthy but excellent summary on the Chris Martenson website. Recommended. Part IPart II
I used to commute by bicycle for years, so I have most of the gear and correct attitude to actually *want* to ride around in the cold, dark, wet winter here. But a bicycle that is replacing a car requires some unique gear. For me, it was simplest to begin with a new bike suited to the purpose. Here’s how I’ve tweaked my 2010 Kona Ute longtail:
eZee electric assist. While I was thinking originally about the Amped Bikes system, I went with eZee because I found a local dealer/installer. The only downside is the weight of the battery; darn heavy. Currently storing in one of the saddle bags, as it is too large to mount elsewhere on the frame.
Light & Motion Seca LED 900 lumens battery-powered light (rechargeable, not dynamo). My winter dark riding will be minimal since I can plan most trips between 10AM – 2PM, but I’ll use this as an always-on light during the day year-round.
Three Down Low Glow lights. One for the rear and two underneath to serve as side lights. Hip and functional. I chose the amber color to match the Ute bags.
Ortlieb‘s Office Bag 2 in black for laptop and other work items. Mounted at end of rack to leave room for (future) stoker kid near seat post.
Second matching Kona pannier bag (large) since the Ute only comes with one. Which is just plain silly. Why would you ride around with just one loaded bag, making you off-balance?
SKS Chainboard: this really is revolutionary. It’s the first chain guard to work with front derailleurs. Keeps everything cleaner. Will take a pro’s touch to get it adjusted smoothly, though. Useful review.
Replaced the standard Kona Ute tires with the relatively bulletproof combination of a flat resistant tube + Schwalbe Marathon Plus tires with a kevlar bead.
A Salsa stem plus Moto Ace handlebars. The standard swept back bars on the Kona Ute are incredibly uncomfortable. I got significant immediate pain in my left hand trying to adjust my grip to the extreme swept back position. I’ll reuse these bars as a stoker bar for my kids riding on the back, where the extreme angle should be a benefit.
Classic bell on the handlebars, along with a mirror.
Ergon grips. Awesome. Amazing. Going to put these on my wife’s bike, too. They even fit the grip shifter we put on to work better with the eZee throttle. Reusing the nice cork Kona grips on the stoker bar.
A waterproof Aquapac on the stem for my iPhone. I can listen to music while riding and easily see when I have incoming work phone calls. Pull to the side, hit the brakes, answer the phone, and suddenly I am “in the office”.
No water bottle cages. Using those areas to mount the bottom Down Low Glow lights and rechargeable battery pack. Will fuel up on yerba mate before I hit the road.
We eliminated as much extra cabling (brake, electric assist, lights) as possible to keep things nice and tight. But there are still alot more cables than normal.
Total cost was about $4500. About the same cost as many high mountain bikes, road bikes, and commuter/city bikes, but very affordable when compared to the cost of an automobile (vehicle, gasoline, insurance, maintenance). The fact that the price was kept affordable was due primarily to the $900 2010 Kona Ute, as the electric pedal assist kit and the lighting system were each $1200. Kudos to Kona for producing an affordable utility longtail bike; you guys rock.
There is another fellow doing a similair experiment named DirtDad. Check out his thread here on the electric vehicle technology forums at Endless Sphere. And the folks at Kona have an electric version of the Ute in the works. Perhaps we’ll see this as a 2011 model.
More photos in the little slideshow on the right. Click through to the Picasa site to view them in larger format.
I get asked often what type of “weapons training” I am doing that does not involve guns. The basic answer of “I train with a stick” usually solicits blank stares in return. Look up a few videos on YouTube like these to see how powerful a practiced stick defense can be:
Arnis (shows transition from stick fighting into unarmed self defense):
Escrima:
Take a moment to look around you and realize just how many “sticks” are within reach as you go about your day. For me, there are usually plenty available (a.k.a. rake, walking stick, tree branch, baseball bat, rebar, shovel, etc).
Warning: take a note from Kip in Napoleon Dynamite. You might not want to train to be a cage fighter by just watching videos. Head to your local dojo for real instruction and full armor/speed practice.
For true emergency planning, you need your garden producing food year round, even in the dead of winter.
This winter I’ll be experimenting with a few different methods, but one initial success is the use of Agribon 30 paper to seriously extend the growing cycle for crops that normally can’t hack the cold. We still have eight different types of salad greens growing strong under these Agribon covered beds. Great stuff.
We’re also focused on different recipes using crops that do well on their own in the cool winter here, such as kale and broccoli.
After we got the dirt/compost into the new beds (on top of cardboard to smother the weeds), we planted a collection of berry bushes. Varieties include seaberries, honeyberries, raspberries, gooseberries, goji berries, goumi berries, and elderberries. We found this permaculture berry guide to be very helpful. We also brought in four more types of grapes and kiwis, both hard and fuzzy, to train along a new trellis.
To combat the strong pasture grass, we’re planting comfrey and nasturtium. Comfrey is not only a great chop/drop fertilizer, but also good to accelerate compost heap decomposition and supplement the chicken’s feed. It also acts as a fortress plant, weaving a thick root system to choke out the pasture grass.
We’re leaving two full beds open to plant potatoes in the Spring. Each fruit tree will have a guild built around it, with strawberries and other beneficial plants.
Free wood chips from local arborists line the walking paths (again, laid over wet cardboard). Food Forest version 1.0 is almost complete, just in time for the rains to begin. I’ve already started making my list of version 2.0 improvements to tackle next summer.
Ugh. I feel like I’ve survived death. Swine flu is *not* fun. I picked up the bug on a plane ride back from Chicago. Just finished four days of misery.
Thank goodness for Oscillo, N95 masks, and a loving spouse. All this preparation is for naught if you don’t have the right supplies on hand when you need them. Your health is everything; tough to enjoy the fruits of your Food Forest when you’re stuck in bed sick as a dog!
Water security. For me that means we could use as much water as we want to irrigate our food crops, even in the middle of a drought. For me, that means a significantly sized source of potable water to use in an emergency. And for me, that means harvesting rainwater.
The nearby sketch shows the setup we built over the past three weeks. We’re harvesting rainwater from the roof gutters, into a “trash can” silt catcher, through to a 3P Technik VF1 Volume Filter, past a 4″ first flush diverter, and then into a pair of 2500 gallon cisterns. Extra rainfall can be diverted into an existing large diffuser once the tanks are full.
Water then passes through a Graf floating inlet filter with 8’’ hose to be pumped back up our hill out of the tanks with a new Grundfos MQ 3-45 1HP 110v pump, feeding the two yard hydrants near the food forest and one yard hydrant near the house.
From sketch to completion, this water storage book – although quite short – was by far the most useful of several I read. I could not find several components locally, so I ordered them from Rain Harvest. Now to go clean up the construction mud and replant grass for the chicken tractor…
 When describing my 3X weekly training sessions I do during my lunch break, I’ve found the easiest, most accurate description is “MMA for self defense, not sport”.
 Moved our kiwi trellis out of the food forest and up close to the house where it can be hidden from view for just one reason: my wife thinks it is ugly.
 Note the waterlogged mail. Clearly the zipper pockets on the 2010 Kona Ute saddle bags are not waterproof. Bummer.
 For my one year experiment of not driving when by myself, I’m replacing the hauling capacity of my car with a longtail utility bicycle. More details here for new readers regarding what constitutes a utility bike and how I selected the 2010 Kona Ute as my final choice.
 A Salsa stem plus Moto Ace handlebars. The standard swept back bars on the Kona Ute are incredibly uncomfortable. I got significant immediate pain in my left hand trying to adjust my grip to the extreme swept back position. I’ll reuse these bars as a stoker bar for my kids riding on the back, where the extreme angle should be a benefit.
 For true emergency planning, you need your garden producing food year round, even in the dead of winter.
 After we got the dirt/compost into the new beds (on top of cardboard to smother the weeds), we planted a collection of berry bushes. Varieties include seaberries, honeyberries, raspberries, gooseberries, goji berries, goumi berries, and elderberries. We found this permaculture berry guide to be very helpful. We also brought in four more types of grapes and kiwis, both hard and fuzzy, to train along a new trellis.
 Ugh. I feel like I’ve survived death. Swine flu is *not* fun. I picked up the bug on a plane ride back from Chicago. Just finished four days of misery.
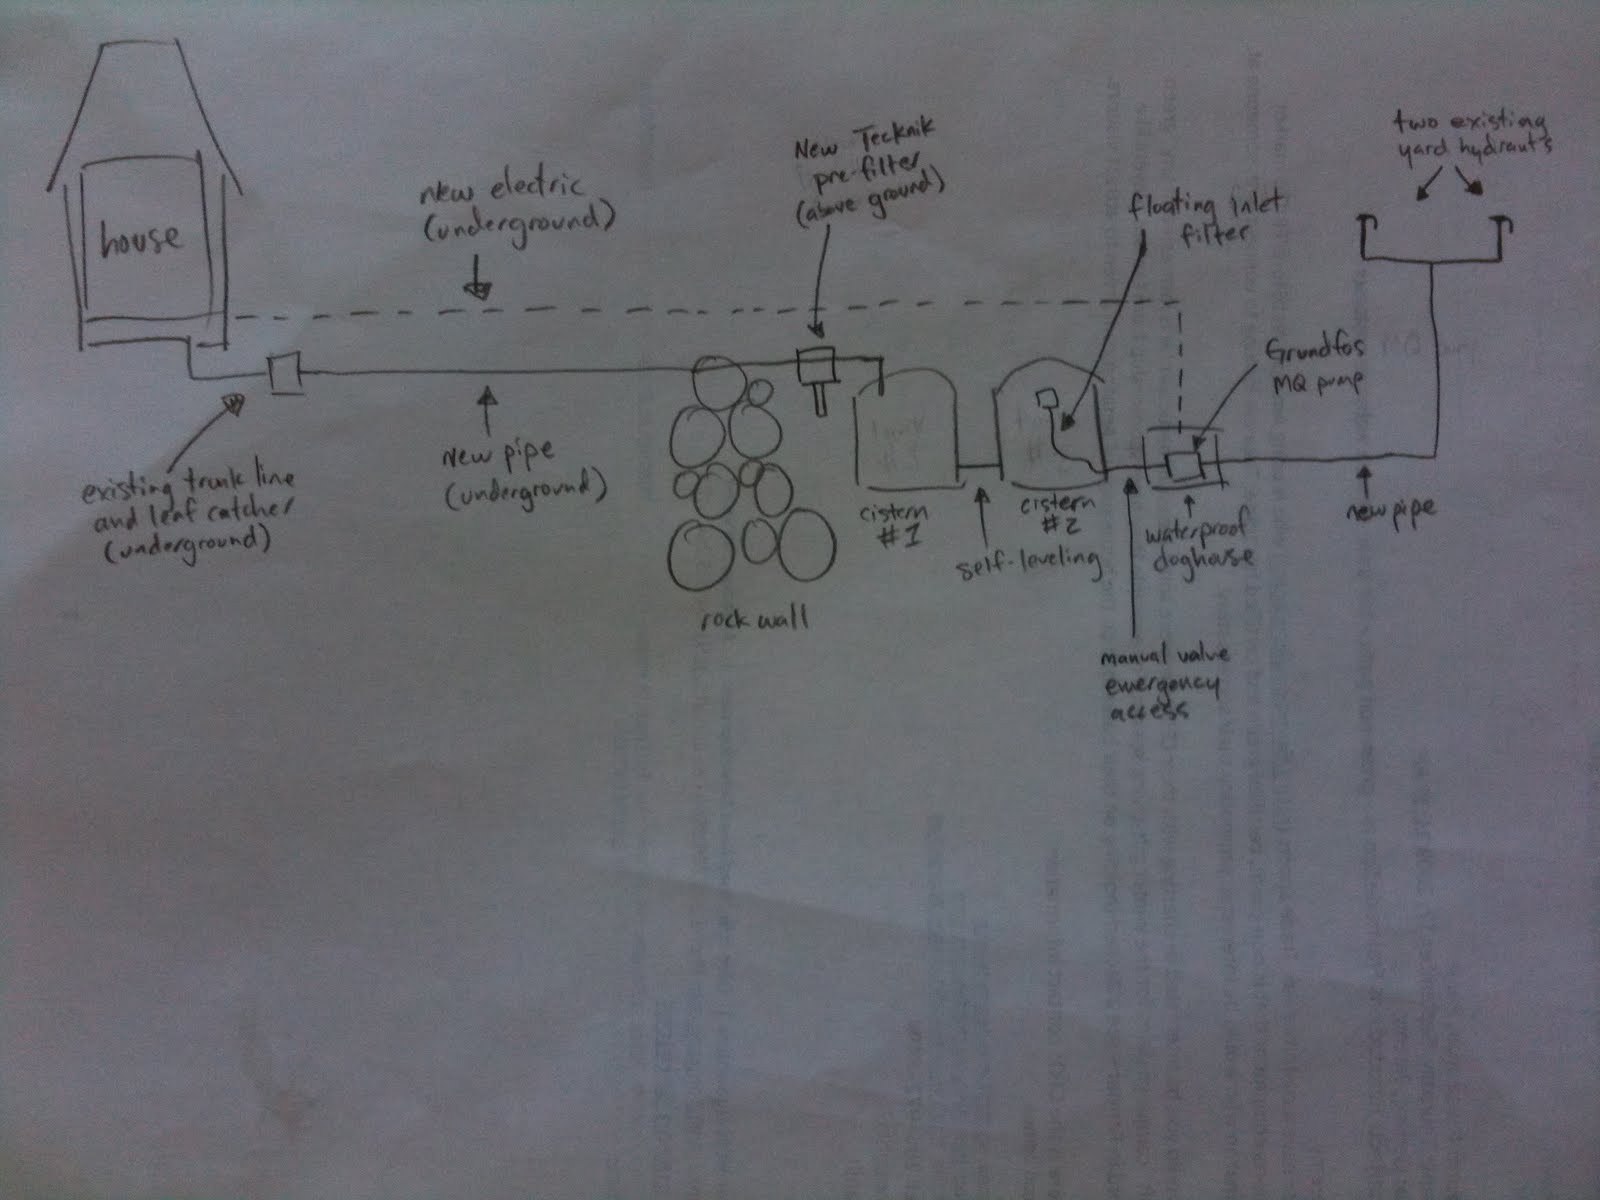 Water security. For me that means we could use as much water as we want to irrigate our food crops, even in the middle of a drought. For me, that means a significantly sized source of potable water to use in an emergency. And for me, that means harvesting rainwater.
 Water then passes through a Graf floating inlet filter with 8’’ hose to be pumped back up our hill out of the tanks with a new Grundfos MQ 3-45 1HP 110v pump, feeding the two yard hydrants near the food forest and one yard hydrant near the house.
 Nothing like training on mixed martial arts with a bias towards real self defense to help you discover new ways to bruise your body.